Live & Score
Choose a difficulty you can enjoy and check your cards' skill conditions. Formation order and acceleration can change the score even with the same five members.

Difficulty and Rewards
For a given song, rewards are generally the same across difficulties except for Full Combo counts. Full Combos are recorded separately for each difficulty.
You do not need to choose a difficulty for its rewards, so play the one you genuinely want to play.
Skills
- Special Skill: Activates in card formation order at five fixed positions for each song. All positions occur at the start of a measure and can be checked in chart preview. A rainbow effect appears on screen when it activates.
- Active Skill: Each card checks at its set interval (every X seconds) and activates with a set probability. Once active, the effect lasts for a set duration. Effects do not stack; if multiple Active Skills are active at once, only the strongest effect applies.
- Passive Skill: Remains active throughout the Live. Its application order follows total base stats from highest to lowest. If total base stats are equal, it follows the card order in your formation.
The master data sets Active Skill activation rates to 55% for High, 46% for Medium, and 37% for Low. Source: HolodoriDB activation rate data
Skill Activation Rate Boost effects are added together first, then applied multiplicatively. For example, if the base activation rate is 46% and the ★5 Irys Special Skill (+45%) is active, 46% × (1 + 0.45) = 66.7%.
Active Skills: interval, chance, duration and effect
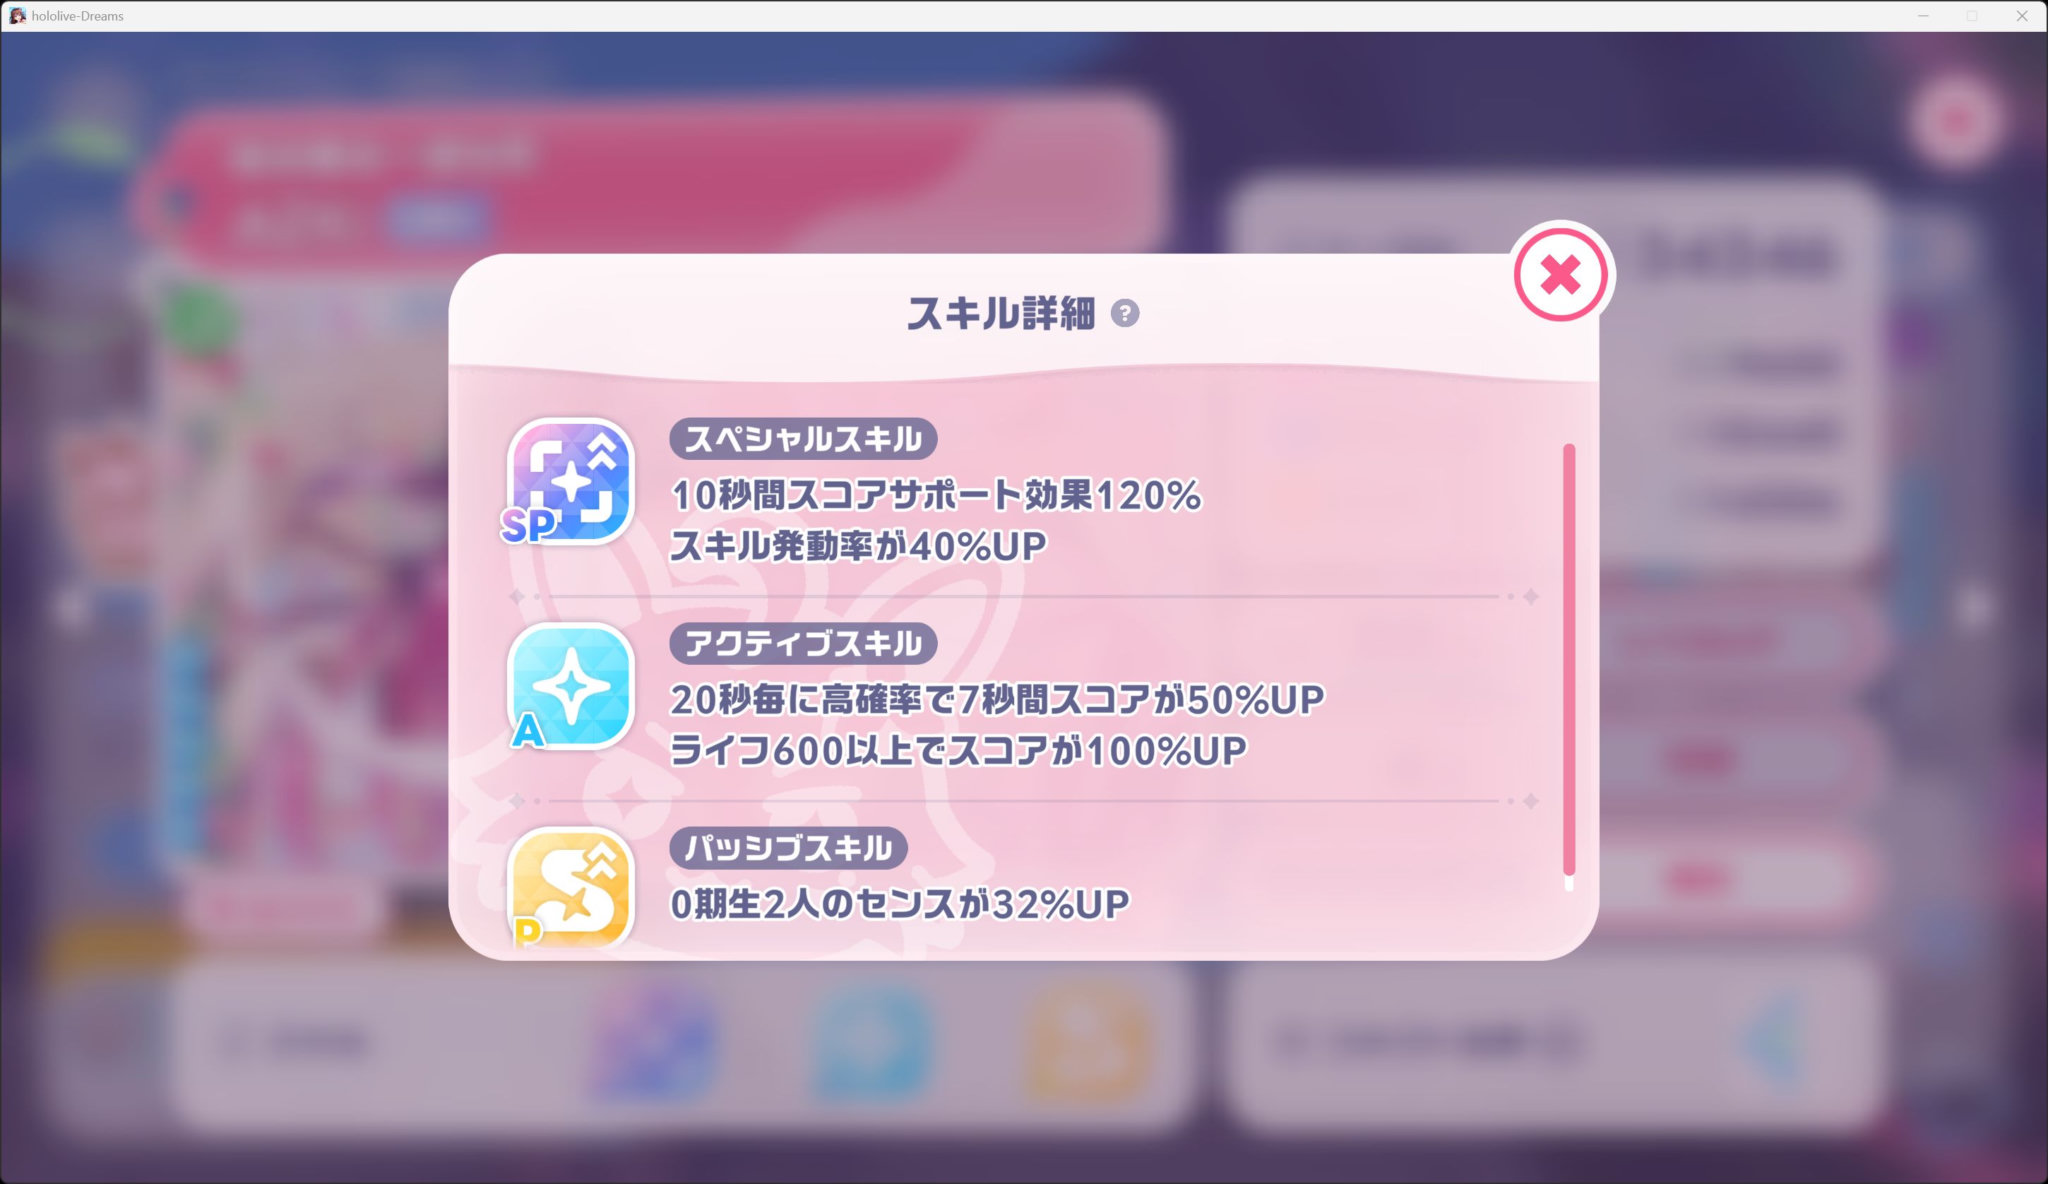
At Bloom 0, AZKi's 咲き誇る一途な花 checks every 20 seconds at high probability for a seven-second +50% score effect; life of at least 600 at activation switches it to +100%. Without acceleration, checks occur at 20, 40 and 60 seconds. A failed check does not delay the next one.
Combo requirements are also checked at activation. Shiori's stronger effect needs 40 combo; breaking combo afterward leaves the activated effect running for its duration. Every card strengthens its Active at Bloom 1.
Activation chance and acceleration do different jobs
The video uses approximate observed rates of 55% for high, 45% for medium and 35% for low. The configured master-data rates listed above are 55%, 46% and 37%; distinguish those values from the rounded observations.
Activation-rate boosts raise the chance per check. Frequency boosts shorten the interval: 12% acceleration changes 20 seconds into 20÷1.12≈17.9 seconds. It can also add checks before the song ends.
Acceleration shifts overlap with other Actives and Specials. More checks can still produce a lower score when the timing becomes less favorable.
Overlapping score boosts use only the largest effect
When Active score boosts overlap, only the strongest effect after score support is used. With equal support, +50% and +100% together give +100%, rather than +150%.
A second Active can cover a failed check from the stronger one. Both reduced redundancy and backup coverage affect expected score. More notes inside the same duration also mean more score.
Specials follow the five chart positions from left to right
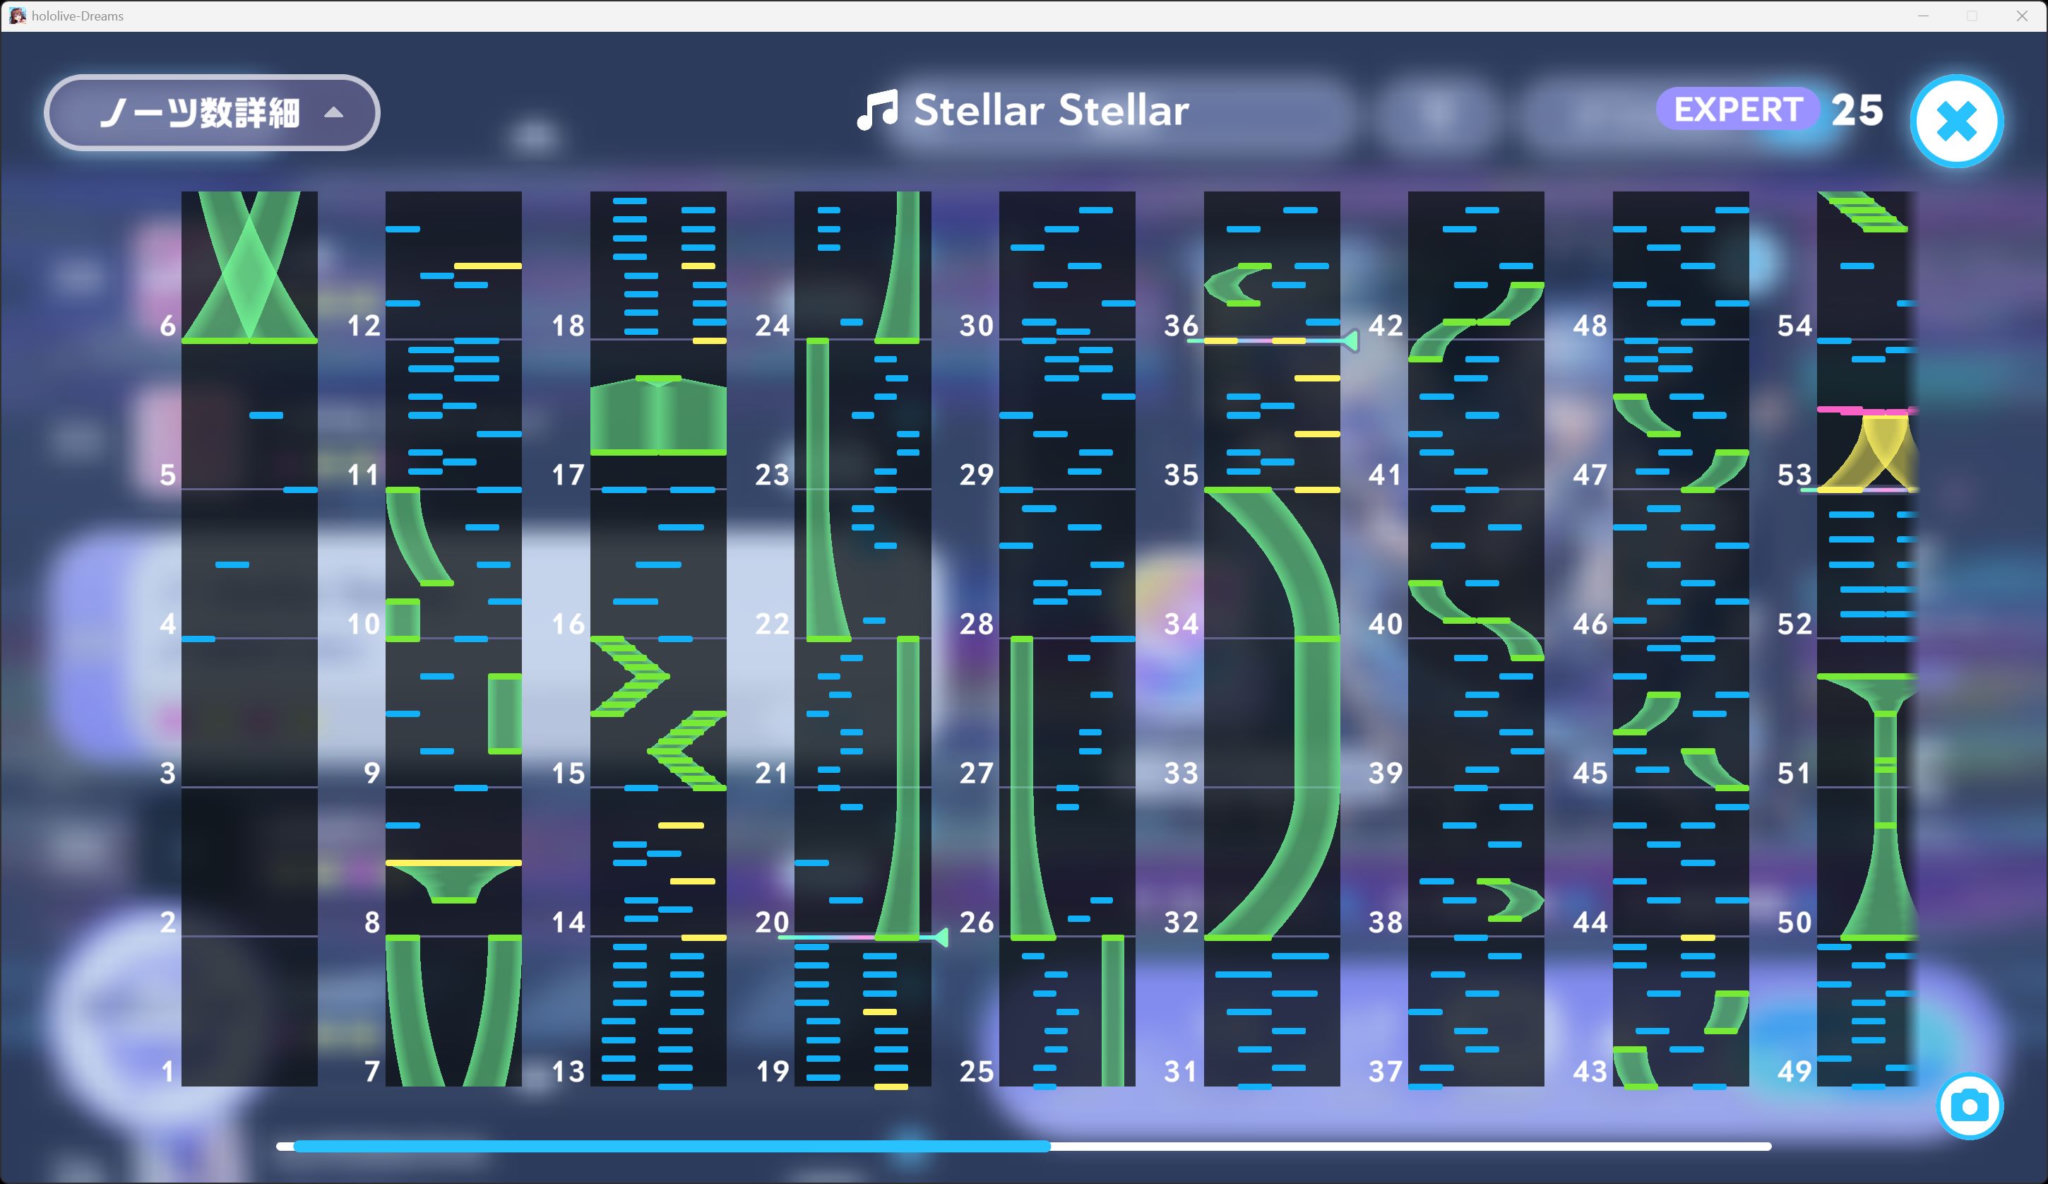
Specials activate at five chart-defined points, following unit order from the left. The horizontal lines and arrows in the song selection screen's chart information mark those positions. Bloom 3 strengthens Specials.
Some Specials boost Active activation chance alongside score support. The boost applies to checks that occur during the Special. Starting at 46%, a +50% rate boost with no other modifiers gives 46%×1.5=69%.
Stellar Stellar EXPERT has Special points at approximately 26.18, 47.75, 70.67, 92.25 and 108.43 seconds.
Passives and conditional effects
Passives continuously affect eligible targets and strengthen at Bloom 4. Limited-recipient effects choose eligible members by the sum of their base parameters, highest first; ties favor the leftmost member. Sense-only boosts use the same selection rule.
Score support strengthens the recipient's Active. HP increases and recovery help maintain life requirements as well as survive the song. AUTO always treats combo as zero, so it cannot meet combo requirements.
Active Effect Indicators
Active Special Skills appear at the top right. Active Skills appear below the score.
holomem Score Rate
This is calculated from high scores achieved while playing with the holomem as the singing leader. The combined Rate of the top three eligible songs is recorded as that holomem's Score Rate. PC-version scores are excluded from rankings.
Score Rate Calculation
- Song Score Rate = ⌈High Score ÷ 5000⌉ (rounded up)
- holomem Score Rate = Sum of the top 3 song Score Rates for that holomem
Example: If a high score is 1,234,567 points, the song Score Rate is ⌈1,234,567 ÷ 5000⌉ = ⌈246.9134⌉ = 247.
Ranking Titles for holomem Score Rate are updated according to the weekly ranking results. A title is granted based on the rank at the time of aggregation and is removed if the rank falls outside its eligible range at the next aggregation.
Score Calculation
Judgments and Base Score
- PERFECT: 100% of the base score.
- Hold: 10% of the base score, with fractions rounded up. A measure contains seven intermediate ticks; the start and end each also award one normal score.
- GREAT: 80% of the base score.
- AUTO: The same as GREAT, 80% of the base score. Combo Bonus does not apply, but Score Up and bonuses do.
- GOOD: 50% of the base score.
- BAD: 0 points and loses 50 Life.
- MISS: 0 points and loses 100 Life.
- MISS during a Hold: loses 20 Life.
PERFECT flick notes score 1.05 times as much as regular notes. AUTO does not apply the additional 5% flick bonus: flicks use the same 80% of base score as regular notes. Hold relay points award 10% of base score rather than regular-note score. Continuation ticks at the same timestamp remain separate; the chart's total note count and skill activation times are preserved.
Skills and Combo
Base score differs by song and difficulty, but the final score changes linearly with the unit's Total Power.
Each scoring event is calculated as Base Score × total Score Up × (100% + total Score Support). Fractions are retained throughout the multiplication and rounded up only when the final score is calculated.
Combo also adds a bonus: +1% from 100 Combo, +2% from 200 Combo, and another +1% for every 100 Combo thereafter, up to +10%.
Unverified Hypothesis
The plain all-PERFECT total, with no additional effects, may be the same on every difficulty. Higher difficulties may have an advantage only through the Combo Bonus. This has not been verified.
Example: why some acceleration stays at 0%
The comparisons use AP expected score: every note is PERFECT, combo grows with passed notes, and life stays at least 1,000. Active failures are included probabilistically.
The initial order is swimsuit Suisei, Sora, Shiori, AZKi and Koyori. Keeping that order fixed gives these optimal acceleration rates.
| Member | Acceleration | Reason in this order |
|---|---|---|
| Suisei | 0% | 4% adds a sixth check but reduces overlap with Specials |
| Sora | 0% | 4% moves checks closer to Suisei, increasing redundant overlap |
| Shiori | 12% | The check near 114.3 seconds falls within Koyori's Special |
| AZKi | 12% | A check just after Shiori's Special starts gives a longer overlap |
| Koyori | 12% | Shifts away from Suisei to cover gaps and increases checks from five to six |
Adding 15 points to move only Shiori from 0% to 12% raised AP expected score from 2,503,810 to 2,544,874: a gain of 41,064. Unit order is fixed in this comparison.
Move Koyori earlier, or buy more life?
Koyori needs at least 1,000 life at Special activation for her +45% activation-rate effect. Slot five requires maintaining that life until about 108 seconds.
Optimizing order and acceleration on the original boards gives a maximum of 2,577,419 with Koyori fourth. Koyori second gives 2,575,221 using AZKi 12% → Koyori 12% → Suisei 0% → Shiori 12% → Sora 0%. This lowers the required maintenance time from 92.25 to 47.75 seconds: 44.49 seconds earlier for 2,198 expected points.
The video also adds 100 life through the red board, removing some blue-board Sense, Technique and activation rate. At matched order and acceleration, this costs 7,774 expected points. Reoptimizing with Koyori fifth changes 2,570,622 to 2,562,535, a loss of 8,087.
Here, Koyori second on the original boards beats Koyori fifth on the extra-life boards by 12,686. These are AP expectations with life requirements met; they do not simulate misses or a recovery trajectory.
Use the simulator for everyday adjustments
The score simulator optimizes order and acceleration without comparing every timeline by hand. Different cards, training and charts can change the optimum.